Narvik PBEM: Allied Turn 4 (April 20 – 23, 1940)
Ragnarok’n’roll
Current Allied Victory Points: +20
(All jabs made below are in jest, lest anyone construe there is bad blood between Alan and myself. We’ve had our moments, but we’ve been getting on rather well)
I placed a copy of the CRT on a separate page up at the top of this one. If HMS asks me to remove it, consider it gone.
So this is what we are reduced to, taking pot shots at each other across the blog?
“costly embarrassments”?
There is nothing that I have done that is embarrassing to me. Except maybe that one time at camp, but I won’t get into that here.
Thanking me for committing three brigades of British troops to create an escape hole? He’s assuming I’m trying to escape!
He needs to be reminded that as long as I hold Narvik and the surrounding area, he’s lost. No matter what else happens.
I didn’t secure Mo because I honestly didn’t think he would try to slip in there, and I expected the Royal Navy to do their damn jobs! The Orzel must have been in England for some R&R. I was proven wrong, and now we must adapt.
As for the Blenheim fighter, I was loaning it to him for some test flights, and he destroyed it. That is the last time I loan him the keys to any of my vehicles!
But if he wants to lecture me about rear area security, he should have left something in Mo himself, instead of trying to reduce the port, which he failed to do.
Just as he failed to destroy the supply base in Trondheim.
I may not have noticed in his last turn jumble that he was shipping something to the arctic, but I’ve noticed this time, and he may be in for a bit of a surprise, if and when he gets there.
His Luftwaffe is getting weaker. He trades bombers for hits, the British already having downed two He-111s and a Ju-88.
And while we are at it, let’s bring up how his combats consist of attacking 0-4 HQ units, or even 1-4 HQ units and 1 strength motorcycle companies (who he failed to destroy, BTW). Anytime he attacks anything bigger, he tends to lose units, the lone exception being that armored cavalry unit he caught out in the open.
Escape? Hardly!
It’s all part of the plan.
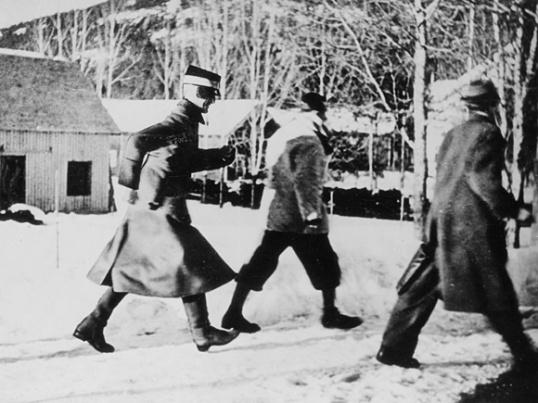
And notice the picture he posted with his AAR! His troops can’t vacation anywhere without burning something down! Is that how he repays our hospitality?
Yes, the Trondheim pocket is collapsing, but I expected nothing less. I sent the British out in an attempt to rescue some straggling units, an attempt which failed. Is the British 24th Guards Brigade trapped? No. They may still be able to fight their way out over the mountains.
And the French are providing a vital service in their current location. After all, the road to Narvik goes through France.
Oh, wait…..
In all seriousness, I don’t feel so bad now. I was reading a few posts on the Europa Association group list, and a couple of people said they were playing PBEM games, and were getting their heads handed to them. And these are some smart people with a lot more experience than I.
Yes, I feel like I am losing this game, but the Allies and the Norwegians can’t drive the Germans out of Norway, unless the German player is a complete idiot and makes several major mistakes. Just wait until the next game, when I’m running the Germans!
But it is the end of turn 4, and the Germans have overrun most of southern Norway, including Oslo, and have moved with lightning speed to the Trondheim area. I really wasn’t expecting him here so fast, but we have to deal with it as best we can.
This is not your typical “frontal” warfare. There really isn’t anywhere to achieve a “breakthrough”.
I keep telling myself that I’m still in this game. He has not gained control of Trondheim, yet. He has not gained control of Bergen, either. He hasn’t even tried yet, but I’m sure that it is part of his plan.
Most importantly, he has not seized Narvik. Plus 100 VP if I can keep him out of Narvik through the end of the game, and an addition +100 VP if I can manage to hold Bergen by the end of the game, giving me +200 VP, and a win.
I suppose I should stop poking the bear with a stick now.
The Allies don’t have a lot of fighting going on. Six battalions mobilize, but only four appear because the other two regiments have fully mobilized, so there is nothing to receive. The four that do mobilize, however, are immediately captured by the Germans.
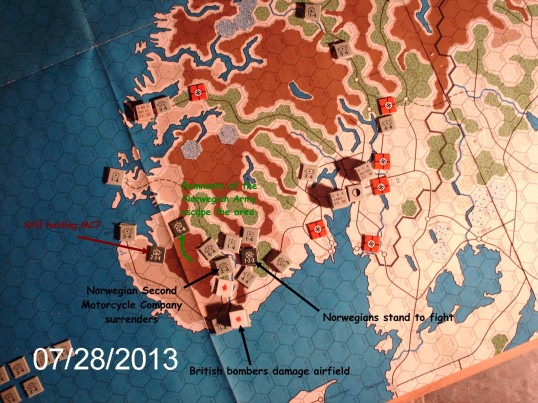 The Norwegian chapter of the Gypsy Jokers, AKA the 2nd motorcycle company is trapped in Evje, being forced to fight at really bad odds, and will die in a blaze of glory. I mean, the odds are so bad, they aren’t even on the chart, but through a bit of luck, they aren’t eliminated outright. The attack goes well, but they end up disrupted, and without the ability to retreat, they surrender to the Germans.
To the east, the remnants of one of the artillery battalions decides to make its stand in the mountains east of Evje, along with a battalion of infantry from the 8th regiment. It’s the best terrain around to defend in, and there’s no need to worry about supplies. The Norwegians have supplies hidden in every mountain and under every tree.
To the west, the I/8 mountain infantry battalion patiently waits for the 7th regiment to wake up and realize there is a war going on. In the meantime, the 3rd X has fled Evje, and escaped into the mountains.
Bomber Command, being of very little use so far away, bombs Kjevik (AKA Kristiansand airfield) in an attempt to suppress the airfield again and prevent harassment bombing on the 3rd Brigade. Only one bombing run is successful (the second coming from Bergen), as the bombs from the second wave fall just short of the runways, resulting in a single, ineffective hit on the airfield (almost got that second hit).
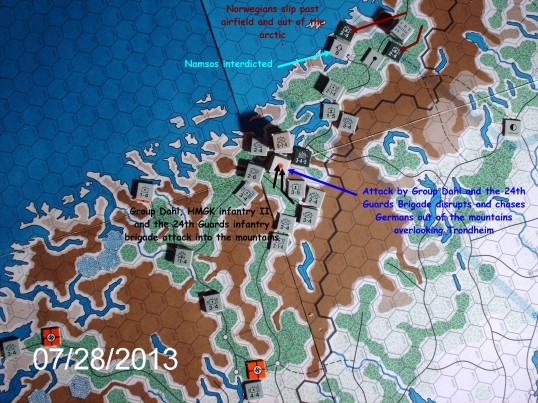
In the Trondheim “kessel”, as my opponent refers to it, the 24th Guards Brigade, along with Norwegian Group Dahl and the HMKG infantry battalion moves into the mountains southwest of Trondheim in an attempt to fight their way to Trondheim. The Norwegian 3rd armored cavalry battalion shortens up its defensive lines and moves to protect the airfield.
The British 146th Brigade, along with King Haakon VII, pulls out of Trondheim and ships to Bodo, setting up a supply base, and taking the antiaircraft with it. There is no need to defend the supply base at Trondheim anymore. King Haakon, meanwhile, sets sail for jolly old England.
After pushing the Germans back in the north, the British 148th Brigade retreats to Trondheim proper. Five individual infantry companies and an antiaircraft battery are shipped in to help shore up the defenses and try to keep the port open long enough for evacuations to be completed.
A squadron of cruisers is dispatched to Namsos to interdict the port to prevent the Germans from landing any more troops there. Right now, it is best to try to limit the number of troops north of Trondheim, as the two Norwegian mountain battalions slip past the airfield east of Namsos and head south to harass and threaten the Germans in Namsos.
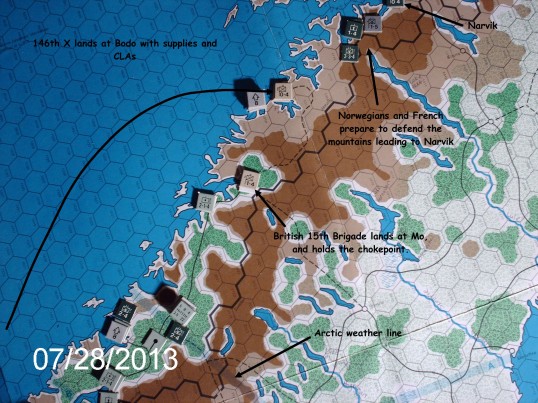
In the arctic, the British 15th Brigade lands at Mo, a natural choke point, while the 146th Brigade, fresh from Trondheim, lands at Bodo and establishes a supply base. The four remaining CLAs are assigned to the defense of the base.
North of Namsos, the Allies have recaptured Mo. No one was guarding the port, so the British were able to slip in unopposed. The Germans now have no ports in the arctic, BUT, my opponent may have been trying to ship a unit into the arctic, because he only shipped 13 of the 14 battalions he was allowed to, which means that one of the battalions was destined for the arctic.
Assuming he survives the anti-shipping roll, he then either has to make an opposed landing (with a -2 DRM), or return to Germany, meaning a second anti-shipping die roll. Most likely, he’ll land it at Andalsnes, which is okay. He still has to survive the die roll, and hopefully the Orzel will be back on the prowl.
There are still ports he could land at in the arctic, like Tana. Or Kirkenes. Kirkenes sounds good. Kirkenes is a long ways away from Narvik.
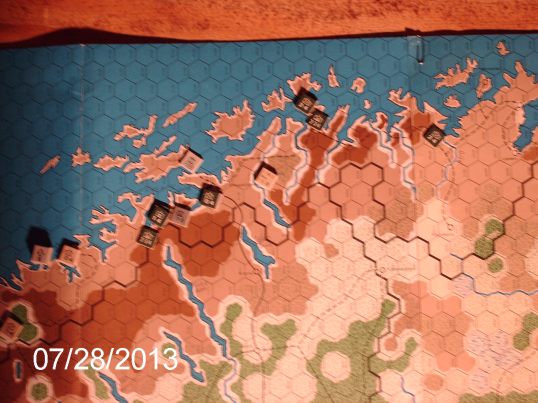
Both of these ports are on map 6A from Fire in the East. This map is not used in Narvik. I’m not really a fan of cutting part of the country off, so I always attach it to the other maps. You can see it on occasion in the photos.
Finally, in the Narvik region, all the ports of import are covered. Troops are moving south to establish defensive positions to hold against the Germans as they prepare to make their fight to the gates of Narvik. The last photo is a bit blurry, as it is the one area furthest from my camera. I do the best I can to get decent pictures, and will endeavor to get a better picture.
Let’s just say that since there are no Germans in the area, everyone has broken out the beer and wine.
Like I said before, I do feel like I am getting beaten to a pulp here, and we are still not even a third of the way through the game. There are bright spots, but overall I feel like I’m losing. We’ll see if I can stem the tide. There is still a long ways to go, though my opponent may feel like I’m simply meat. =)
One of the pictures does not reflect the German retreat from the mountains after combat (I will update it when I know where they are going).. Another picture shows an interdiction counter at Bodo, but I have put in a request to adjust its position. I’ll update as soon as I know whether my request is granted or not, but that may not be for a few days.
My opponent is away for a few days, so it may be awhile before turn 5 begins.
In the meantime, just for giggles, I am going to break out another of my favorite games: B-17 – Queen of the Skies.
Much appreciate the CRT and other charts being posted. Sigh, good luck on the copyright foolishness.
Love the slip past in with the Norwegians in the medium north…as and the success of the attacks Trondheim zone.
Seems the thing will hinge on the ability of the German to fight airfields forward N. of the A line.
Care to chat a bit about airfield forwards tactics?
LikeLike
The Germans get a single, 3 capacity “frozen lake” airfield that they can place. Putting it north of Trondheim assists with the problem of projecting airpower north, as Trondheim is the last airfield until you reach Bardufoss to the east of Narvik. The Allies, on the other hand, get three single capacity airfields to place, and he has captured only one.
The primary difference between frozen lake airfields and regular airfields is that if I were to score a hit on his frozen airfield, it would be destroyed permanently, instead of suppressed. Unfortunately, since he bombed and destroyed my Whitley bomber, I don’t have the bombing strength to destroy the airfield, being less than 2 strategic bombing factors. I can’t use Bomber Command, because it is too far, and I have to return them to England every turn. I have several torpedo bombers coming available next turn (why I have torpedo bombers against an abstract fleet is beyond me, but whatever), but they can’t take out the airfield, only the aircraft. The Allies are seriously lacking in bombing capacity.
I do wish I could capture and dismantle them on the ground, but alas, I can’t.
Alan is a retired National Guard officer, so it doesn’t really surprise me that he’s doing what he’s doing. I think I am starting to get my footing, but he hasn’t taken his next turn yet, and that could change everything.
Right now, he has two threats to deal with, both of his icy airfields. Well see how he responds.
LikeLike
So, if he’s able to knock out the Narvik port via air…how big a disaster is that?
LikeLike
Not a disaster at all. He can knock it out if he wants, because he has to capture it or a hex next to it to fulfill his victory objective. Alan’s right, there are still two ports nearby from which I can get supplies, Harstad and Tromso, so destroying the port achieves very little.
LikeLike
Stalag Trondheim is getting smaller! Only three hexes left. My opponent should look at the German order of battle, all those Infantry DIVISIONS arriving soon to deal with stragglers.
Unfortunately, there are two other ports near enough to Narvik to keep Allied troops there in supply. Fortunately, the Germans don’t have to take Narvik, only be adjacent to it.
Once we take control of the Trondheim airbase (this coming turn) we can start bombing further north. Also, one should note the 12 factors of German AA at the northern (frozen lake) airfield. Send those little Swordfish, we will deal with them.
LikeLike
Yes, yes, yes. I know that there are two infantry divisions and a mountain division still coming, along with a motorized brigade which does you no good in the mountains. I also know you have another mountain division coming, which incurs a VP penalty if you activate it.
Go ahead and take the airfield, if you can. I’ll still get out. =P
It should be fun to watch those little torpedoes skitter along the ice towards your planes. =D
LikeLike
The Swordfish can carry 1 torpedo or 1 mine or 1500 lbs of bombs.
LikeLike
Apparently they were armed with torpedoes on my last turn, as they skidded off the ice and into the snowdrifts.
LikeLike