TFH: August I, 1940 (August 1 to August 15, 1940): Germany
A couple of items that have been discovered since the last post, and one I forgot.
British Mobility Limits
The British ground units, once placed, have only a limited movement ability. The British player can spend equipment points to provide support to unsupported brigades, but they cannot move out of their placement areas until there is an actual invasion. The Order of Battle sets the British army up in 6 different areas (kinda like the Soviet military districts, but they aren’t outlined on the map): Scottish, Northern, Eastern, Western, Southern and Irish Commands. Units can move all over their specific commands, if they wish, but they can’t leave their setup areas. They can also take those supported brigades and turn them into divisions.
Position AA and Airbase Defense
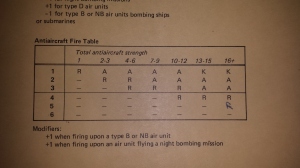
This game is also one of the few that has airbase defense anti-aircraft. On the back side of AA counters is an airbase symbol that denotes those AA points as airbase defense. When firing in defense of the airbase, their strength is increased by 1/2. That is, if there are 2 points of airbase defense in a hex, when firing in defense of the airbase, it has a value of 3 points. It really doesn’t make a difference as far as column shifts are concerned until there are large amounts of anti-aircraft in the hex.
The AA Chart
The AA chart is completely different from Narvik, and different from the rest of the Europa games. Facing 16 or more points of AA (ala the Royal Navy) 5 in 6 air units (or 4 out of every 6 bombers) should have something happen to them, on average. Makes me wish we were using the other AA chart. I like my chances better with that one.
Sequence of Play
The final thing is that the sequence of play is utterly out of whack:
- Reinforcement Phase
- Air Phase
- Naval Phase
- Air Return Phase
- Supply Determination Phase
- Movement Phase
- Combat Phase
- Exploitation Phase
The last three are in the normal order, however, the determination of supply has dropped from one of the first things to be taken care of to the 4th. The air phase has also popped up from just after the movement phase to after the initial reinforcement phase.
The more modern order of play is
- Initial phase (including supply determination, reinforcements & replacements)
- Movement Phase (including naval movement)
- Air Phase
- Combat Phase
- Exploitation Phase
Look, Mummy! There’s an Airplane up in the Sky!
It is fine flying weather! Skies are clear, and the seas are calm.
There is no time to waste.
But as any good German Luftwaffe commander would do, I deviate from the plan and waste time.
The Germans immediately set about striking southern Britain. There are some tempting targets out there, the Irish Sea squadron being one of them. Because of the 40 hex range of the Ju-88As, the Irish Sea squadron is within easy striking distance. However, the squadron AA is very thick, and losses would be heavy. There are factories in Coventry, Bristol, Oxford and Northampton, but there would be a lot of patrol attacks to get to them. But there are also other targets to choose from as well.
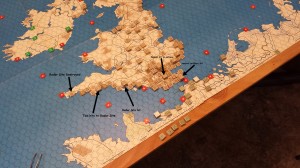
Coastal artillery, airbases, and radar sites are selected for destruction. Some areas are subjected to heavy raids to entice the RAF to come out and play.
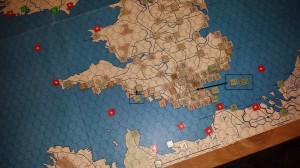
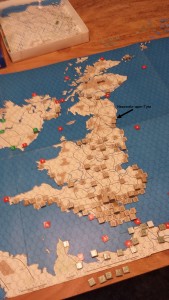
The two stacks of Luftwaffe counters just to the right of the English coast are in the hex that is being pointed to in the picture above. It is a Fighter Command airbase, and the Luftwaffe is trying to shut it down. I didn’t want to have a skyscraper stack in that hex. The two Ju-88s outside of Bournemouth (hex 12A (the left map) are actually in hex 4009. Again, I didn’t want a stack that was too tall. There are no air corps markers. To be honest,as I get older, it is becoming more difficult to handle counters without them flying all over the place.
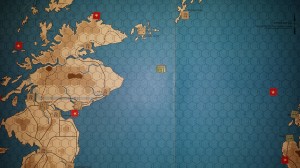
The North Sea belongs to the Luftwaffe; Sub hunters search for British submarines (click image to enlarge)
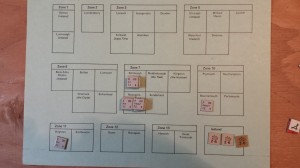
From Norway, several bombers go sub hunting. A raid on Scapa is a possibility, but only one set of bombers can make it (at normal range) and the port is protected by Hurricanes. They can, however, reach the patrol hex of zone 3, outside of Hurricane patrol range, and immediately begin hunting the Oberon class submarine. They need a 6 to spot it before they can bomb it.
For those who believe that bombing the radar sites is a waste of time and resources (myself included), consider the following.
As the Luftwaffe spreads out to perform their missions, and escorts are assigned, half of the escorts are turned back due to patrol attack prior to any interception, leaving many bombers and dive bombers vulnerable. Only the escorts bombing the southernmost airfield are untouched, and that is only because the British chose to ignore them. The end result is that most of the tactical bombers are left uncovered, and the Me-110Cs are forced to drop their bombs early. I try to protect them the best I can to make sure they can complete their missions, but as always, the British have other ideas..
Air combat goes a little better, with the Luftwaffe losing a Ju-87B and a Ju-87R, the latter KIA over friendly territory, the other over enemy territory. Three others are aborted. On the British side, they lose a Spitfire, while a Hurricane and a Blenheim 4 night fighter are aborted. Dogfight scorecard: British 2 kills, 3 aborts. The Luftwaffe: 1 kill and 2 aborts. Overall, the comparison is about as historical, with the British claiming more Luftwaffe aircraft than they have lost.
Flak over Dover aborts another Ju-87, and flak over another radar site to the west returns a pair of He-111s.
Total tally: Luftwaffe, 2 KIA, 4 aborted, the British: 1 KIA, and 2 aborted.
The sub hunt in Zone 3 is successful, with the bombers out of Norway spotting the sub 3 times. One bomb comes close to striking the sub, but in the end the sub escapes.
The radar sites far to the west suffer two hits each, destroying one! Only three to go to take down the radar net, but the odds of a second 0 strength radar station being present are very slim. Considering that I have no idea what the value of the other one I hit is, I have no idea how much needs to be done to it. (The picture was taken prior to British air return)
The damage tally is this: One radar site destroyed, one that has two hits, one that has a single hit, double hit on an airbase, one hit to coastal artillery in Dover, and one submarine crew that probably needs to change their pants.
A lot of this will be repaired, but this is only the beginning. The fact that a lot of these will be repaired should never mean that bombing should stop. In fact, let’s take a look at the radar sites again. If the British need to repair a radar site, they have to spend precious equipment points. Every equipment point spent fixing a radar site is one less angel that earns their wings, one less brigade gets supported.
I said that I deviated from my plan earlier. The deviation was the airbase raid. I had not intended to raid the airbase, but then I thought that maybe Alan would try to defend it. He didn’t bite. The whole point of the exercise to was get the RAF in the air and challenge them to a fight. They didn’t go for it, choosing to go after other, softer, targets, concentrating on the dive bombers.
This is exactly why it is much more fun and challenging to play against another human being. You can never be sure what the other person is seeing or thinking, plotting to destroy you.
The Germans forgo any naval movement this turn. I don’t want to expose German shipping to too much bombing before I am ready to go across the channel, or expose the few ships that I have to the same kind of thing. I have only 7 destroyers (how many were sunk in Norway?). The British have bombers near where they can patrol Zone 13 easily. I tried to get rid of some, but the British proved to be very ferocious about in defending that airfield.
The British, in a very surprising move, has moved the fleet at Scapa Flow south to Newcastle-upon-Tyne. It’s a move I was not anticipating, but it does bring the entire British fleet within range of German bombers. The German eyes in the sky are watching these moves closely.
(Editor’s Note: I mistakenly put the fleet at Newcastle, and it has been pointed out to me that they actually moved to Edinburgh. I will correct this when I have time. No one said German Intelligence Services were perfect. We’re still working the bugs out of those satellites)
There is no German ground movement, either. There are only three construction units on the map at this time, and there is no damage that needs repairing. There is no combat, except for a few members of the construction units waving across the Channel. There are no motorized units for exploitation, either.
For the first couple of turns, I’m kind of feeling my way around the game. I already see some things I can do better. It has been decades since I’ve even opened this box, and I think I’ve only actually played it once. The rules are still unfamiliar, at least those that are different from standard Europa, but not like it was with Narvik, which was a completely different animal.
Prior to the game starting, there are visions dancing in the head about all the damage that will be caused by the Luftwaffe. It must be the Hermann Göring Syndrome. Believing the Luftwaffe can do more than it is actually capable of.
I’m wondering, though, how this would play out using the standard AA chart. Maybe it would have worked out the same. I do wish, however, that they had actually released Lightning War before worrying about the monster, Total War.
With a -1 DRM on B types bombing ships at sea and as much flak as the ships in the Irish Sea can put up those Ju88s will probably not bother them
LikeLike
A couple of notes:
1. RAF patrol attacks returned 5x Me109E and 1x Me110C, air combat returned 1x He111, 1x Me109E and 2x Me110C, AA fire returned 3x He111, 3x Do17 and 2x Ju88. That is 18x Luftwaffe air units not reaching their target hexes.
2. The largest Luftwaffe raid was against the Fighter Command airbase at 12:4303, south of London. 7x Me109E, 7x He111 and 2x Do17 attacked, none of which were patrol attacked or intercepted. They achieved 2 hits which will be repaired by a nearby Construction X. Three RAF fighter units returned to the base flashing V for victory (and possibly other) hand gestures at Jerry.
3. Airbase AA can only fire at airbase bombing , air unit bombing and transport missions. In TFH airbase bombing and air unit bombing are two different missions, you don’t get a two for one special deal.
LikeLike
I did some heavy editing last night and thought I had taken that out. Apparently not, but it is fixed now.
LikeLike
Modern rules and maps vs TFH. In TFH coastal defense can be destroyed by bombing or naval bombardment, in modern rules it can only be suppressed.
As Tony has mentioned, there is a lot more variety and quantity of terrain on SF maps, making England an easier place to defend.
On SF maps the coastline has been cleaned up, not so many slivers of hexes having to be covered. The Isle of Wight is connected to the rest of England with 3 narrow straits and it is an escarpment. As it stands in TFH it is an out of supply island hex and if the Germans take it the British cannot even counter-attack because they can’t make opposed landings.
In TFH forts and permanent airfields cost the British 1 equipment point each, pretty much ensuring none of either will be built. Seriously, the Brits can’t afford to dig in their troops.
LikeLike
The Germans lost 10 Destroyers in Narvik. I am sure that later on you will wish you had those.
LikeLike
The Germans also lost 1 CA (Hipper), 2x CL, 2x TB and 6x U-boats. The British lost 1x CV, 2x cruisers, 7x DD and 1 sub. The Royal Navy could afford the losses. http://en.wikipedia.org/wiki/Norwegian_Campaign
LikeLike
Oops, that German CA was Blucher (Hipper Class).
LikeLike