Narvik PBEM 2: The German Invasion of Norway (April 9 – 11, 1940)
It Looked Good on Paper
The rumor mill in Berlin has it that the Allies are planning on occupying Norway in order to block the shipment of Swedish iron ore to Germany. Attempts to convince the Swedes to reclaim Norway and prevent the Allies from forcefully occupying their neighbor prove fruitless, so once again it falls to us to prevent Allied aggression against Norway.
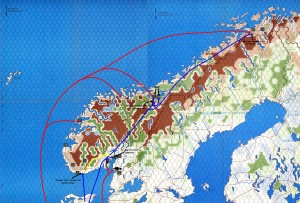
This game, the Germans are targeting Narvik from the beginning, rather than trying to fight our way there. The 3rd Mountain Division is stripped down of all but essential personnel and shipped to Narvik, where they slip past a napping Royal Navy and land without resistance. He-115 wasserflugzeuge fly into Narvik harbor unopposed, buzzing Oslo and Trondheim as they fly by.
Meanwhile, the 367th/214 infantry regiment lands without trouble at Trondheim.
But, of course, that stupid die roller strikes again. Out of 15 battalions shipped over in the invasion wave, four of them are sunk by the Royal Navy. Some traitor must have tipped them off that a new game was starting. Four battalions! That’s four sixes rolled in nine attempts! Twenty seven percent of the invading force has been sent to the bottom, half of those in the infamous Oslofjord. Thirty two hundred men lost.
Have I made my point yet?
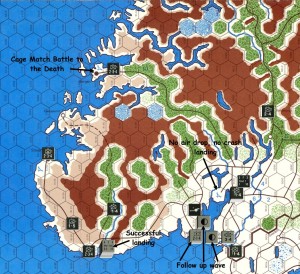
It’s the rest of the ports where the trouble begins. The 1st battalion/196th Infantry Division is sunk trying to land unopposed at Andalsnes. The 1st Battalion/181st Infantry Division is sunk at Bergen, landing only the 2nd Battalion. This should get interesting if the Norwegians don’t run away. The battalion is facing 1:2 odds in combat at the moment, so they begin to raise a ruckus in an attempt to scare the Norwegians away.
In the Oslofjord, the 3rd Battalion/69th Infantry Division attempts a landing at Larvik, and is sunk. The task of the 3rd was to move north to capture Mobilization Center 3 and the Norwegian artillery stores there.
The 1st and 2nd battalions of the 69th Infantry Division were to land at Fredrikstad and move east. The 1st was to capture MC 1 and the artillery stores there, while the 2nd was to cross the Glomma River and block the 1st Brigade HQ in Halden, preventing it from escaping.
But the 1st Battalion was sunk, and it now falls to the 2nd Battalion to capture the Mobilization Center. The Norwegian brigade HQ will likely escape and be sacrificed on the alter of expendable units.
Total VPs awarded to the Allies at this point, +8, none of which was under my control.
Three Ju-52 carrying an airborne battalion flies to Fornebu, the airfield west of Oslo, and base of the Norwegian Gladiator squadron to drop on the airfield. Of course, the Gladiator challenges the transports, and the Germans roll yet another 6. That is now five 6’s in ten trolls, a 50% clip. If this were normal combat, I wouldn’t be displeased, but this is ridiculous.
The Gladiators shoot down one of the transports, taking a company of fallschirmjaeger with it, at a steep cost. Tack on another 5 points for the Allies (+1 for the transport, and +4 for the parachutes), bringing their current total to +13.
Inclement weather (which did not stop the Gladiators from intercepting) prevents any jump over the airfield, so we will have to resort to plan B. This is where I’m going to get a bit crazy, especially since the stupid roller insists on rolling nothing lower than a 5, so we’ll see how well this works out, or doesn’t work out. (The fact that it was not rolling less than a five at the time should have been the clue I needed to stop me from trying this at home)
One transport, carrying the 2k/1 parachute company heads to Kristiansand airfield to attempt a crash landing. The one carrying the 4k/1 will attempt to land at Fornebu.
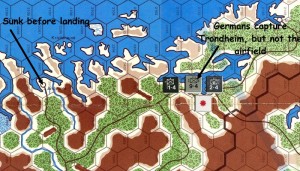
There are six transports that have made their way to the Trondheim airfield, and one of those transports is going to make an attempted landing at that airfield.
This is either going to work, or it is going to cost me a lot of victory points.
And in the end, it cost me 12 VPs. Total Allied VPs: +25, and I’m sure they aren’t done yet.
The transport at Trondheim crashed, killing the battalion on board. The other five crashed due to a lack of fuel to get back. Total VP: 7 points.
At Fornebu, the Ju-52 carrying the 4k/1 parachute company crashed, killing the company (for a total of 5 VP).
Why? This time the roller rolled a pair of 5s.
The only squadron to make the landing was at Kristiansand. At least we have a parachute company, an infantry battalion and supplies have been airdropped there.
I’m not worried so much about victory points as I am about the loss of the transports.
It was something I wanted to experiment with, and the gamble did not pay off. That’s life. We’ll move on, but I don’t have high expectations for the follow up wave.
The Ju-88s succeed in disrupting the battalion defending Trondheim (II/12). Attempts by He-111s flying at extended range don’t produce any results over MC 13. But at least nothing was shot down.
Me-110Cs, flying an extended range mission over Oslo attempts to bomb the HMKG battalion, but now the die roller has gone cold, and all the pilots get for their efforts is the finger from people on the ground.
Most Norwegians run away. Only the pesky 4th Brigade HQ in Bergen stands to fight. The Germans get a good roll (the die roller has switched from rolling 6s to 5s), and we get a 5, a Half Exchange. The Norwegian HQ and the 2nd Battalion destroy each other, as well as the trucks. Another VP for the Allies
In Trondheim, the 5th Brigade runs away, the HQ moving west towards Andalsnes, and the disrupted II/12 battalion moving southeast to guard the airfield.
Here’s what I should have done differently. Since all Norwegian units in Trondheim ran away, this regiment could move 1 hex in the exploitation phase, including entering an enemy controlled hex, which is the situation here. Had I not forced 1st Bn of the 214th to commit suicide at the Trondheim airfield, this regiment could have broken down and two battalions could have moved to the airfield and forced the Norwegians to flee since that battalion is disrupted, and the airfield would be mine. Limitations of the countermix.
Believe me, even though this plan has blown up in my face, I am taking notes for the next time, 30 years down the road.
So what possessed me to try this stunt?
I believe that Trondheim and the associated airfield are two of the most important hexes in the game, and I wanted to secure them as quickly as possible. The sinking of 4 battalions during the invasion wave is not my fault. That’s just the way the dice tumbled. Or generated, in this case.
The hex with the airfield cannot be parachuted onto, because it is in a forest hex. It is also at extended range, so I had to double up on transports. I figured that a 50% chance of sticking the landing was actually better odds than the 1 in 3 chance of paratroopers making their jumps. There is a steep price for failure, but I convinced myself that the dice would go my way, and everything would be okay.
I tend not to be a conservative player, and sometimes I take silly risks. I felt it was worth a try. Of course, had it been successful, I wouldn’t even be talking about this. If you are too conservative, you run out of time. Of course, I didn’t have to try to win the game on the first turn, either. Like I pointed out, there was another way to do it that wasn’t as risky.
The battle at Bergen was bad luck from the beginning. Had both battalions been landed successfully, the dice would still have rolled an HX, but I would still have a battalion at Bergen, and possession of the airfield.
Out of six airfields, instead of possessing four of them, I have one.
Surprisingly enough, the follow up wave landed in one piece, including supplies and tanks, but they have to wait until the next turn before they can move.
So, I fulfilled my promise to Alan that I would spot him a few points early on so that he wouldn’t feel so bad when I crushed him during this game. 😀
Hopefully I got my Bodo moment out of the way. I know I definitely had my Montgomery moment, reaching for an airfield too far.
For those who wanted to play along at home, and asking if I could post copies of the Vassal replay, this blog does not allow those kinds of files, nor does it allow zip files. Sorry.


Whew, German is certainly not risk averse. Lawdy. Pleased that I can view the Narvik gambit played out. As to the South of Norway, yuk. High risks for big success at Throndhiem and Oslo and Narvik, sure. But all over the south? All that stuff is doomed in the South. What’s the hurry?
LikeLike
I had a bet with my wife that I could crush the Allies in 8 turns or less……
J/K
I’ll explain more fully in a bit.
LikeLike
Your wife should double down right now.
LikeLike
She already has……
LikeLike
8 Turns or less to victory? Now, that sir, would need to be a fine plan, indeed it would. I can’t possibly relate to you just how much I look forward to your further development of it.
LikeLike
The idea was to seize as many airfields as possible to deny their use to the Allies, and to get the dive bombers into Norway as quickly as I could (once they become available). Especially the Trondheim airfield where I could not only deny them this link to the north, but have dive bombers there to scramble any Allied eggs that came into reach.
LikeLike
Tony also wanted to land more troops at the Trondheim airbase but after I pointed out his transports and cargo would all die if he didn’t make the landing roll and 6 of them would be overstacked (the loosey goosey rules don’t say what happens, just that there can not be more than 6 air units at the end of the player-turn) he changed his mind.
Were it me, I’d have landed something at Trondheim with the He115s instead of the Mtn XX HQ at Narvik and advanced onto the airbase with the Rgt. I also wouldn’t have tried to capture airbases by landing two transports carrying 4 VP Para Companies (that will cost another 4 VP when they fail to withdraw = total of 16 VP) when transports carrying 1 VP Inf Bns were available (total 2 VPs).
Yes, losing 8 Ju52 on the first turn and having 3 He115 in Narvik where they will have to spend turn 2 flying a transfer mission severely inhibits the German buildup. Since 2 of the Ju52s in the dead pile were airdrop capable that leaves 1 remaining, and therefore the Germans cannot conduct any extended range parachute missions for the rest of the game.
Placing 7 full REs in the staging box also means the Germans cannot even attempt a landing in the A weather zone, so the Allies have less to worry about in that department.
LikeLike
I only changed my mind after the capacity issue came up and I had to modify the plan.
But the Germans cannot land the floatplanes at Trondheim until turn 2, because the port is not German owned until the combat phase when you ran away.
Having the floatplanes in Narvik does not severely inhibit the German buildup. Losing the 6 transports severely inhibits my buildup, BUT I SHALL OVERCOME!
Like I said, I had convinced myself that it would all work, because that damn dice roller had been rolling crap for so long that it had to roll right and fly straight at some point. I shouldn’t have attempted landings with a fully loaded aircraft.
Ah well, live and learn. It’s just a game, right?
LikeLike
Can you feel my pain from the last game?
LikeLike
I felt your pain watching all those crappy rolls you got last game. Planning the German invasion isn’t easy, that’s for sure.
LikeLike